Bendy Mummies
Mummies aren't supposed to be cute right? Well, these ones are! Kids in elementary school and older should be able to knock these together in 10 minutes. And then you can have fun bending them into poses (this can be truly hilarious). Or, use them to create cute table decorations - they could hold little name labels for place settings at your Halloween table....
Project Info
| Difficulty | Slightly challenging |
|---|---|
| Duration | Under 15 minutes |
| Age | 5+ |
| Submitted by | |
| Share |
Materials
- 2 White Pipe Cleaners (Chenille Stems) per mummy
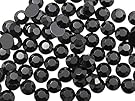
- Black Rhinestone stickers (eyes)
- Several Strips of Muslin / Cheesecloth Fabric each 1/2 inch wide
Instructions
- Take the first pipe cleaner. Form a loop in the middle of the pipe cleaner. Do this by gently folding in half, and twist the two halves together by 2 twists about 1 inch down from the fold. Then open up the loop that is created between the fold and the twists. This is the head.
- Form the arms as follows: Take one of the ends and fold in half. Twist the two halves together along their length. Repeat for the other end.
- Take the second pipe cleaner and fold in half around the base of the loop you created in step 1 (i.e. wrap around the neck like a scarf).
- Now make around 4 twists to secure the new pipe cleaner to the head and arms, and to create the Mummy's body.
- Finally form the legs in the same way as you did the arms - i.e. by folding the ends below the twist in half and twisting along the length of the fold.
- Take one of your strips of muslin and tie it around the neck of the Mummy. Wrap the strip around the head and neck until it is covered. When you get to the end of the strip, simply tie another one on to the end. Continue wrapping until you have wrapped the entire Mummy with fabric strips. Now tie off, and tuck the ends under nearby strips.
- Glue rhinestone eyes onto the head.
Tips
- When wrapping the Mummy's tummy do multiple layers on top of each other to bulk it out a bit.
- Create strips of muslin by snipping a small cut at one end of the fabric (About 1cm) and then ripping / tearing apart.
Reviews
✶✶✶✶✶
Not yet reviewed
Useful supplies
- our picks from Amazon for this project:
Related Books
- our picks from Amazon for this project: